
Meet Pando, the world's oldest living organism
Just outside of Fish Lake, Utah lies a beautiful stand of quaking aspen. But this isn't just your average aspen forest.
Meet Pando
It's been named Pando, or alternatively, The Trembling Giant. Scientists believe that this stand of aspen is actually just a single living organism. Each of the approximately 47,000 ordinary looking aspens growing over 106 acres is genetically identical to one another and shares the same root system. It's estimated to be an astounding 80,000 years old, making it the oldest known organism on Earth. Pando is also believed to be the most massive living thing, too.
A single organism
Like creosote, aspens are clonal plants that can reproduce vegetatively (as well as sexually) from a single individual. What appear to be separate trees are actually stems growing from the lateral roots of a single individual tree. Each new tree shares the same dna and remains connected via the root system, even sharing nutrients and possibly disease. Over time, this single organism can continue to spread and grow, even as particular stems die off. In this way, the organism seems to repeatedly cheat death.
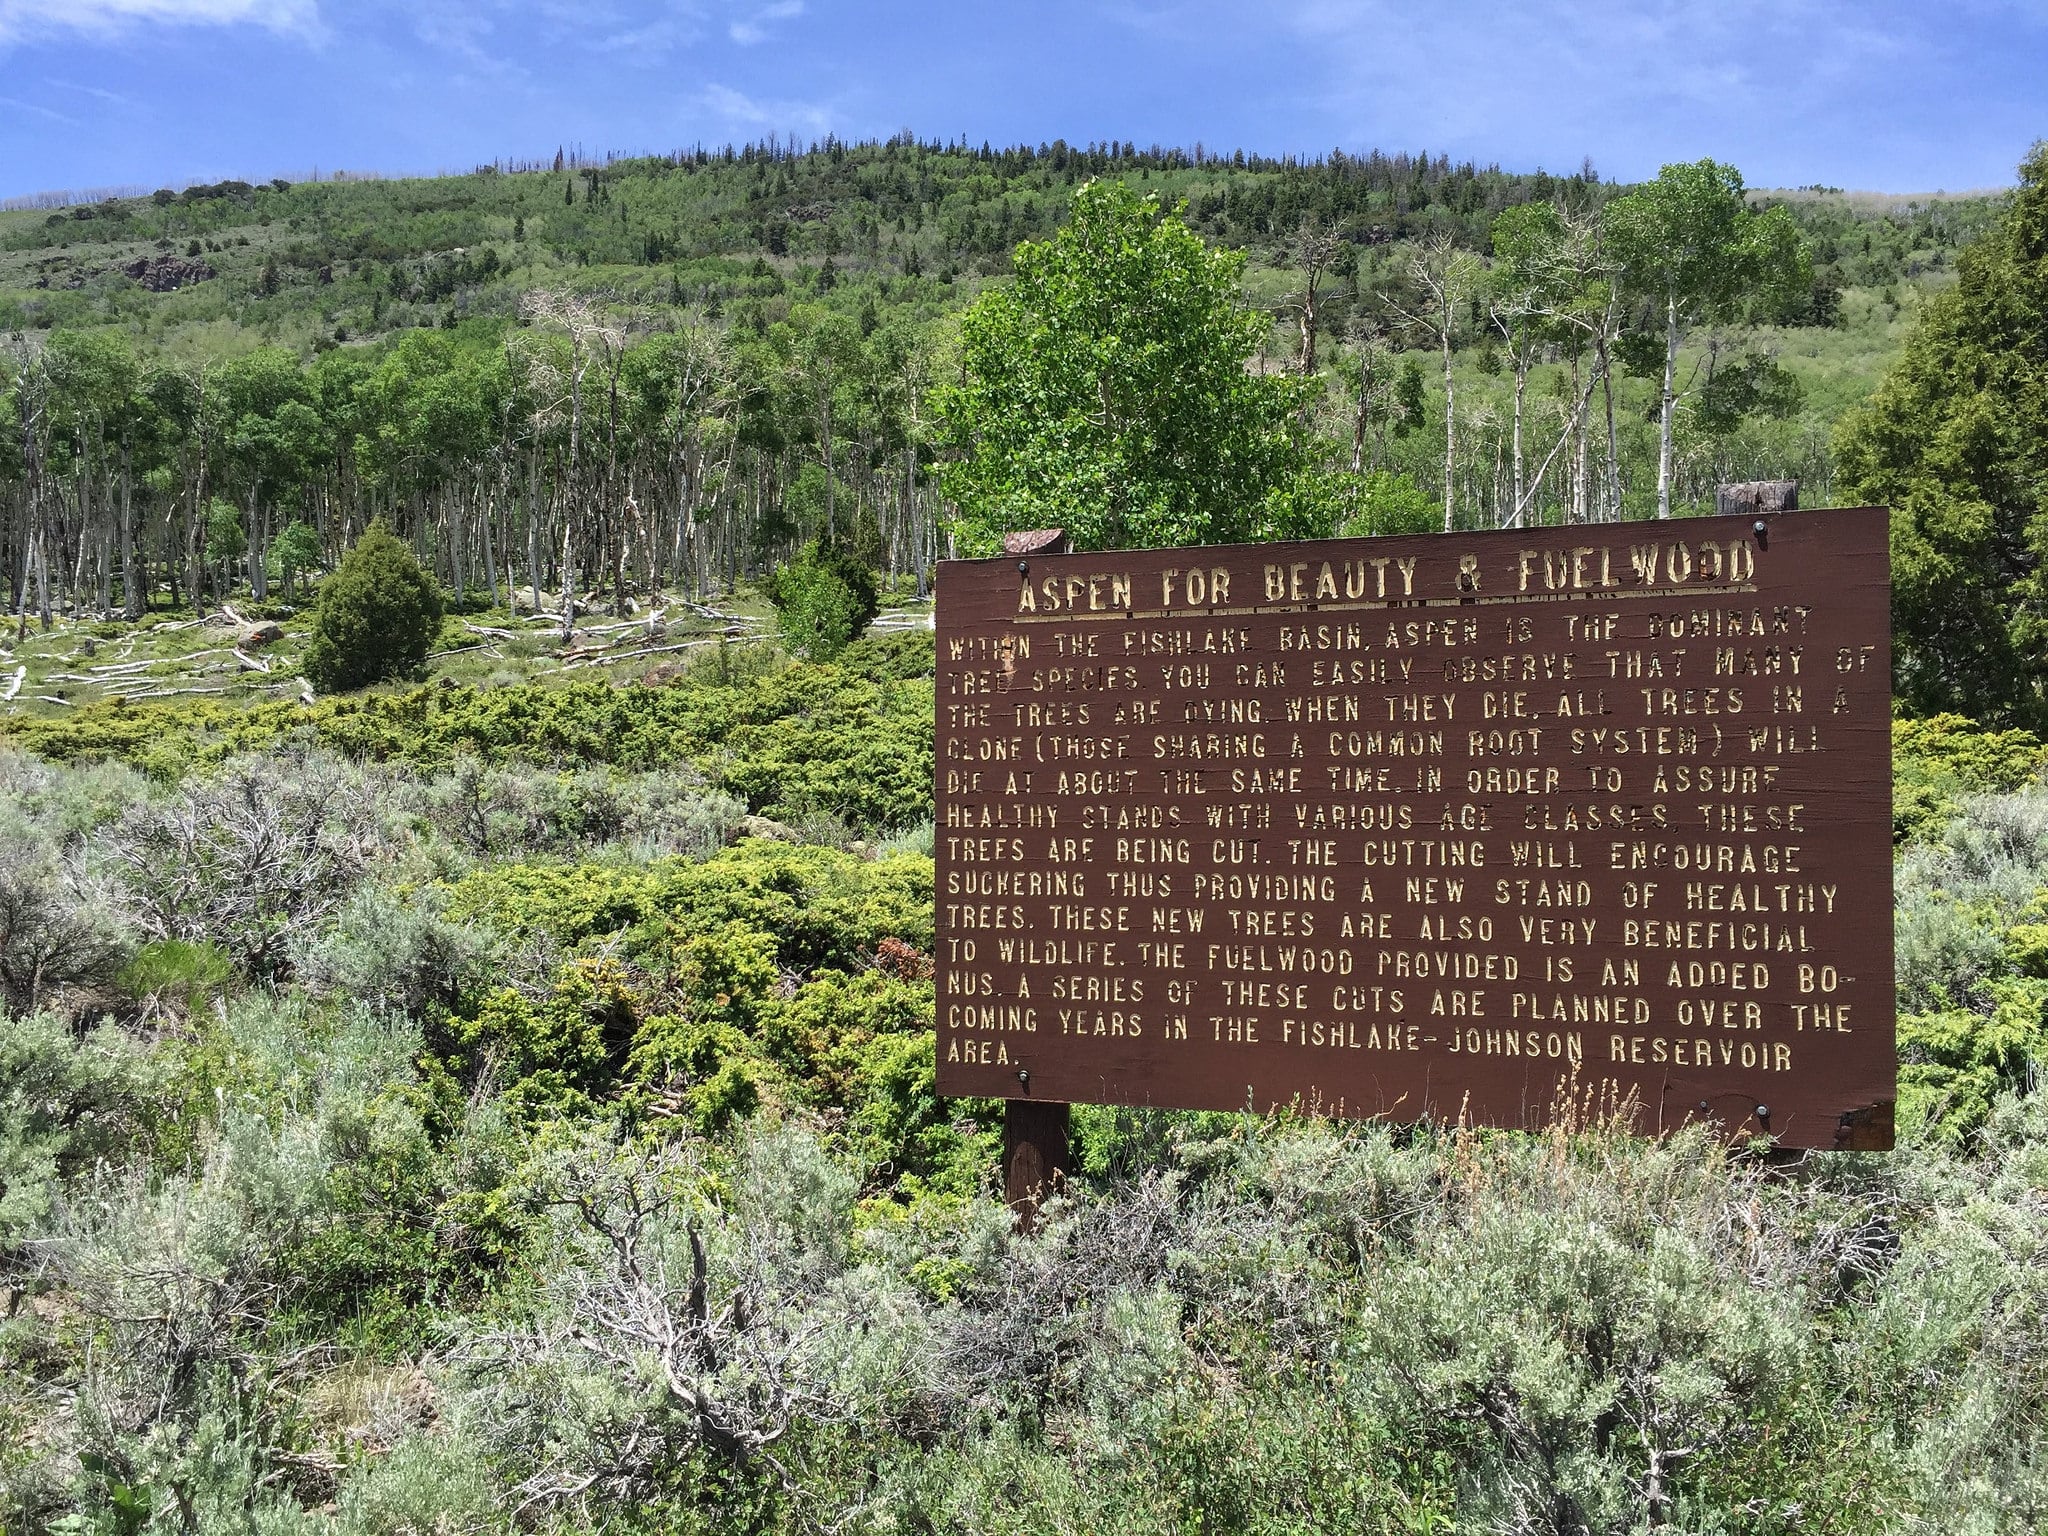
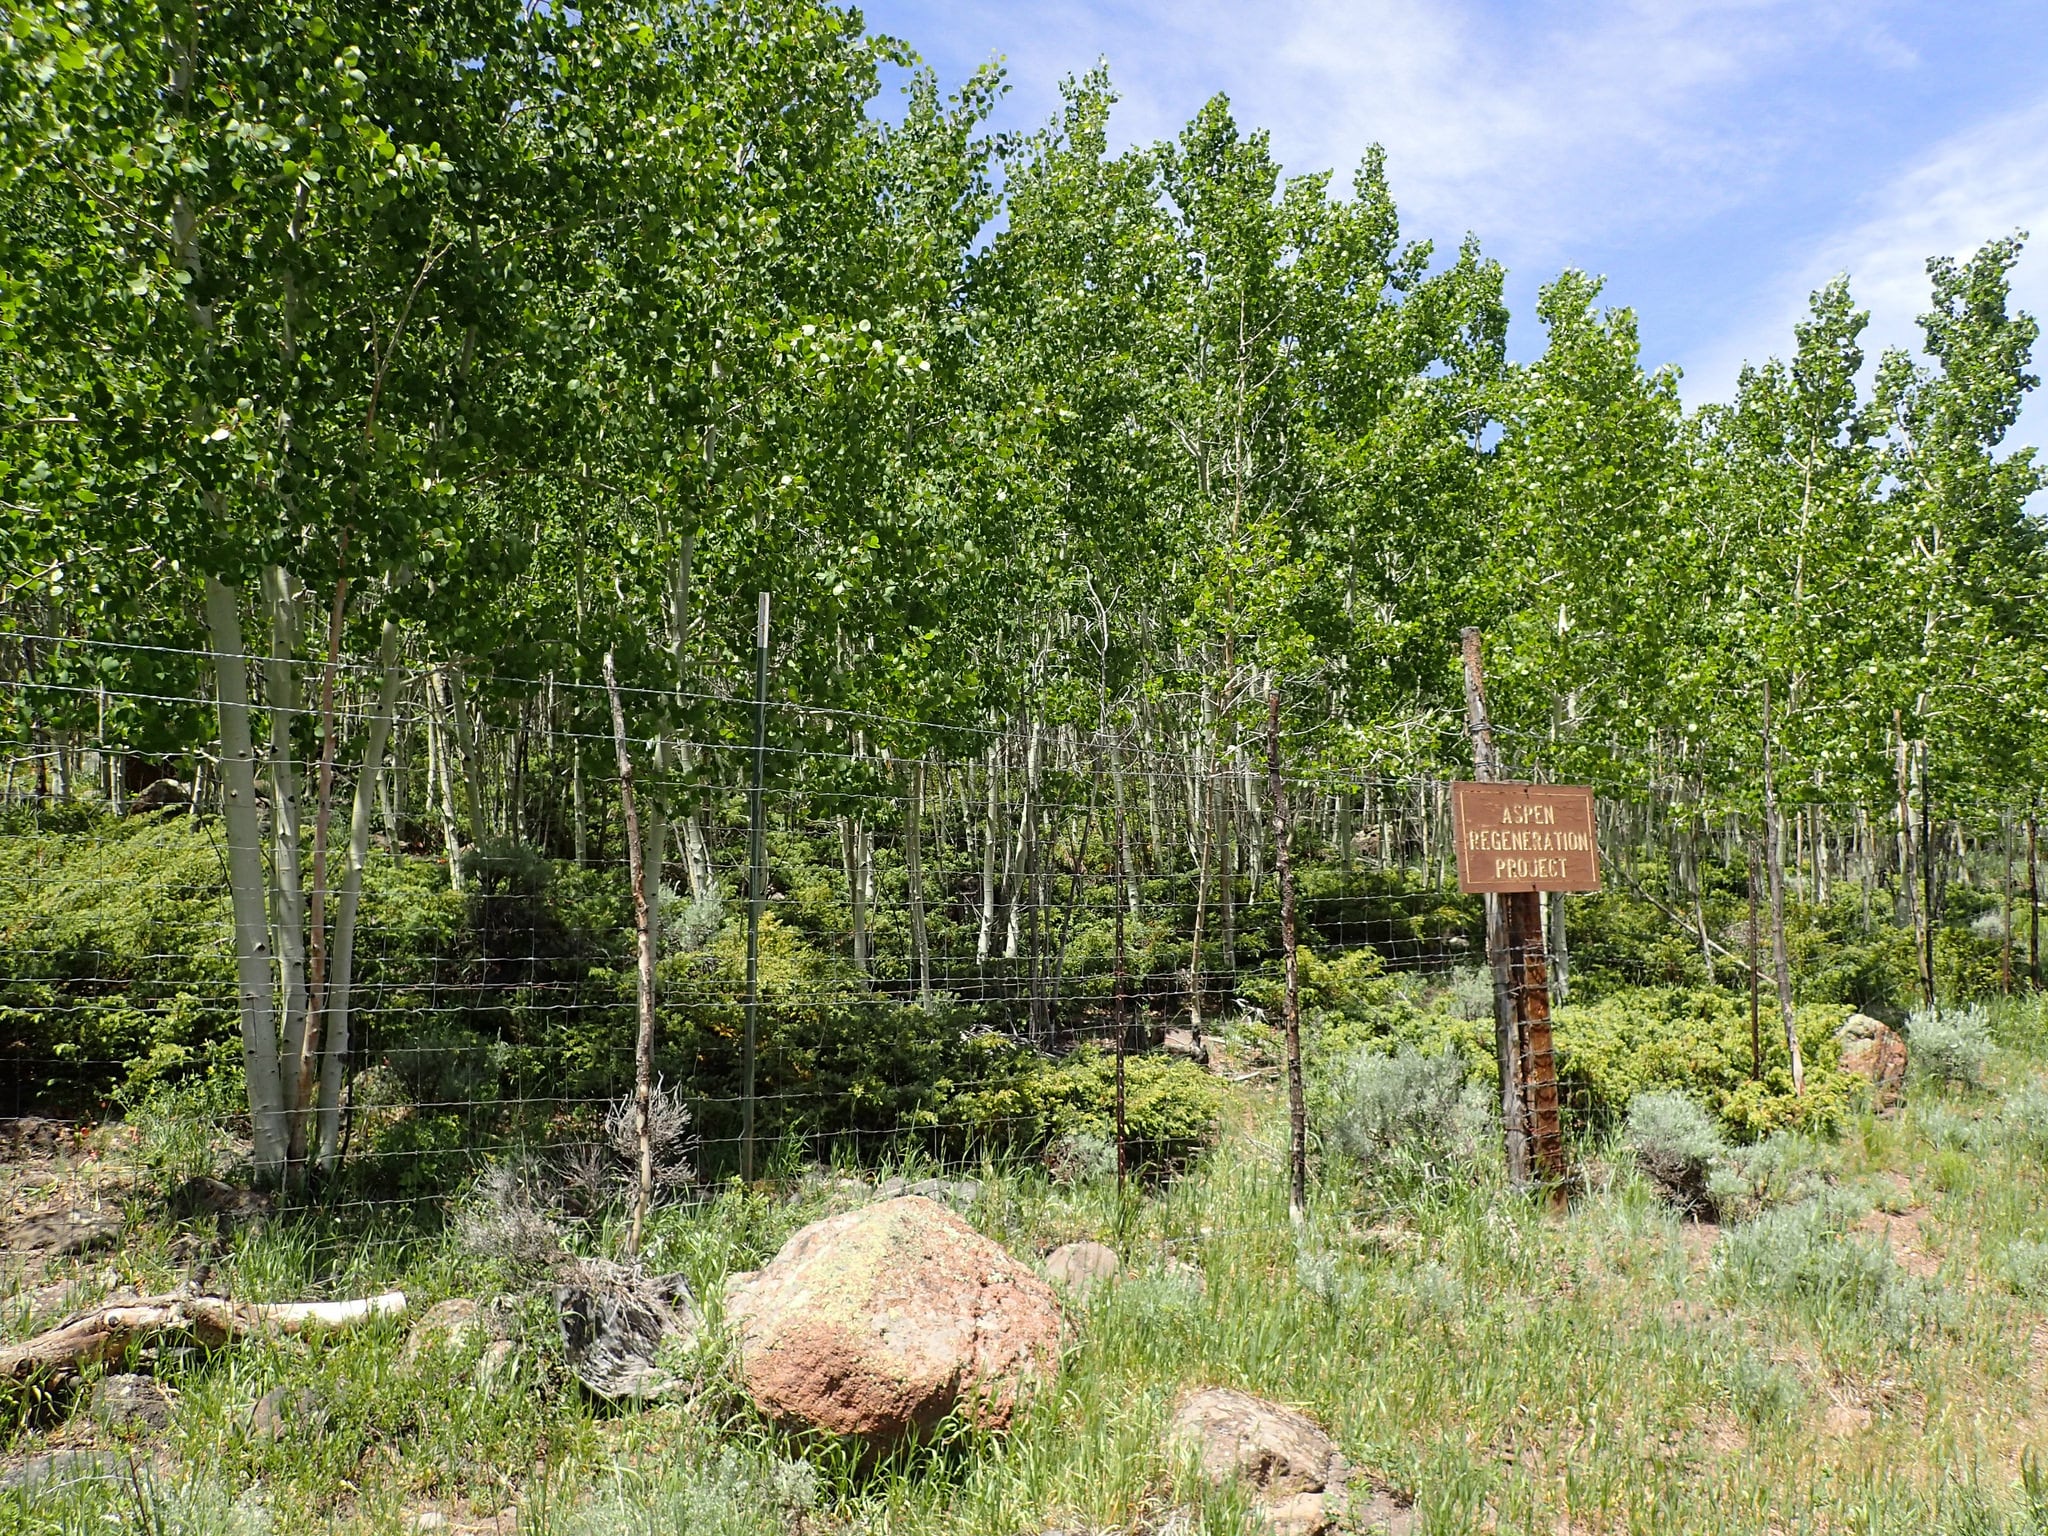
Is Pando dying?
Unfortunately, Pando doesn't seem to be regenerating new trees to replace the ones that die off. Efforts are underway to study the problem, which includes fencing off several monitoring plots as well as treating plots with understory fire and canopy thinning.
Visiting Pando
Unlike other famously-old trees, Pando's location is well known and easy to access. The grove is located in the Fishlake National Forest in Utah about one mile south of Fish Lake and is bisected by Highway 25. You can easily find it on google maps. As mentioned above, parts of the forest have been fenced off and aren't accessible. But there's plenty of Pando otherwise accessible to visitors, including a section of it containing a campground.
Your Pando "moment of zen"
Kayaking the Salt River Under a Full Moon

One of my favorite annual trips to lead is a moonlight paddle down the Lower Salt River east of Phoenix.
The Salt River is a great little trip either early in the morning, or long after the tubers have gone home—it's serene, has some nice scenery, is convenient to the metro Phoenix area, and offers easy logistics. I think it's at its best during a full moon.
Armed with water cannons, some adult beverages, and glowstick-decorated kayaks, we met at Blue Point Picnic Area after work, unloaded our boats, and set up the car shuttle. We hit the water just as the sun set and stopped to enjoy the moonrise over the mountains in the first eddy downstream. There's something special about paddling a river with just the light of a full moon. With the limited light, there's an interesting incongruity: ripples and small rapids seem more exciting while the overall trip seems more placid.


Generally speaking, our night was more float than paddle. We shared beverages, enjoyed small conversations, and relaxed in the tranquility of the water. We stopped for a break and a group photo at the beach at Goldfield Ranch, joined by about a dozen feral Salt River horses. Drinking vessels sufficiently refilled, we returned to the boats and continued downstream to our take-out at Phon D Sutton Rec Area.
The remainder of the trip was a continuation of the earlier enjoyable night. The water cannons got quite a bit more use, which are particularly fun when you're not entirely sure who squirted whom. The worst part of the evening was finding ourselves at the take-out; it had arrived much sooner than everyone wanted. Clearly, we'll need to arrange another one next month.
I didn't put much effort into taking photos. The combination of low light, the constant rocking of the kayak, and my preference for carrying a small point-and-shoot camera generally make for less-than-stellar photos. However, I post them in the hopes that they paint at least a crude picture of the evening's moonlight adventure.
A 'Monumental' Day of Blogging
Today, nearly 30 outdoor bloggers came together to publish posts in support of our national monuments on the 111th anniversary of the Antiquities Act. We called it 'A Monumental Day of Blogging' and ask readers to defend #MonumentsForAll by submitting a public comment during the national monuments review.
Here's what we wrote:
- Deeply Personal—Why I Care About National Monuments - Just Get Out More
- Five Reasons to Love National Monuments - Nightborn Travel
- A Monumental Fight - AZ Day Hiker
- Rio Grande del Norte National Monument - Nature Tech Family
- Pro Tips: Tommy Caldwell Talks Public Lands - Little Grunts
- In the Heart of the Creek - Mike Off the Map
- Dear Mr President - The Zesty Traveler
- A Monumental Day of Blogging - Parks and Points
- A Monumental Day - West Coast Hiker Girl
- Hands Off Our National Monuments - Campfire Guy
- Celebrating National Monuments For All of Us - Val in Real Life
- Why You Should Be Championing #MonumentsForAll - Inner Compass
- National Monuments: The Bears Ears Debate and How You Can Help - Sun Kissed Hiker
- What is a National Monument & Why Should You Care? - Bearfoot Theory
- Speak Out For Our National Monuments Under Review - Terra Galleria
- Dear Secretary Zinke - Wilderness Within Her
- National Monuments, Public Lands & Wilderness - Southwest Dude
- Public Comment on the National Monument Review - Modern Hiker
- Hikes Across America's Monumental Day of Blogging - Hikes Across America
- New York National Monuments: What Are They? - Backcountry Petite
- Monuments For All—Help Save Our National Monuments - G Who Travels
- My National Monuments Public Comment & How You Can Submit Your Own - Explore With Heather
- Two Monumental Reasons To Fight: Grand-Staircase Escalante & Bears Ears - The Modern Outdoors
- A Monumental Day For Our Nation - A Gray(t) Adventure
- The Antiquities Act: A Monumental Success - Illuminations from the Attic
- 4 Lesser Known National Monuments and Historic Sites of Arizona - Hiking the Trail
Thank you to everyone who submitted comments during the comment period. Even though we were largely ignored by Sec Zinke in his attack on Bears Ears and Grand Staircase-Escalante, the remaining national monuments have been spared—for now, at least.

Deeply Personal: Why I Care About National Monuments
Thank you to everyone who submitted a public comment by the deadline!
I've struggled for days to write this post. But nothing I type seems remotely adequate.
Some drafts have been too argumentative. Or too wonky. Others have been downright angry. One was rather melancholy, a sad ode to losing the places you care most about. I'm stumped—there's really no way to say all that needs to be said. I guess I should start with this simple sentence:
National Monuments are deeply personal to me.
Over the last two decades, I've visited most of the places that term has ever graced—from the very first to be designated, Devils Tower, to one of the last, Bears Ears. I've backpacked in National Monuments that have been expanded and recast as crown-jewel National Parks, and hiked in National Monuments that have lost their protected status entirely. I've camped in obscure national monuments you've never heard of, and navigated through crowds of tourists to gaze upon the most famous of vistas. I haven't been to all of them—not quite yet—but I will. I've been inspired by too many to ever stop.
But this post really isn't about any of those experiences.
Nor will this post argue policy, or point out the infuriating inaccuracies and bald-faced lies that we've heard from monument opponents. It won't detail the troubled legality of Trump's national monument review, or recount why the whole thing has been an utter sham, or explain the economic value of protected lands to rural communities. I won't lament the short-sightedness of this administration or the lasting scars they can cause. I could refute for hours the arguments proffered by opponents, dazzle you with charts and maps, or spellbind you with the words of those inspired by these treasured places. I could stir your very soul with photographs and video.
Instead, I'll share a few glimmers of what I saw while working on national monuments over the last 12 years—the personal side of it. The full tale is, as you'd imagine, far too long to recount here today, and so is the list of characters involved. This will be but a brief glimpse into that world.
When I see national monuments, I don't just see amazing landscapes that protect our natural and cultural heritage. Because of my involvement over the years, I can't help but see several layers of story deeper. I see the countless people that help make these places even more special than they already are—that make the national monument designation actually mean something.
I see a middle-age woman who fell in love with a single vista, and left her man and corporate job and happy life in the city in order to see that view every night. An unexpected community leader, she's now involved in everything of note in her tiny gateway community, including personally financing the creation of a volunteer friends group she runs for the adjacent public lands she cares so much about.
I see a retired man who loves exploring, who spends countless weekends traipsing across wind-whipped plateaus in search of pottery sherds and rock art—making a hobby out of expanding our knowledge of the area while populating the database that's studied by land managers and archaeologists.
I see a government bureaucrat who still remembers the first time he stepped foot in his favorite national monument—two decades before it became one—and couldn't stop smiling at the scene before him. He endures the tedious parts of his job because of memories like that one. And that tedious work, even when I don't agree with each of his decisions, brings the promise of the national monument closer to fruition.
I see a graduate student, lending her newfound knowledge and seemingly boundless energy to the board of directors of the national monument's volunteer friends group. She stumbled into involvement with the group last year, and now spends her Tuesday nights in meetings and her treasured Saturdays—her only day off—coordinating various monitoring and outreach projects.
I see a shy man, who inherently avoids conflict and any remotely political discussion, sitting at his computer in the dim light of his living room. He's carefully outlining a powerful guest editorial that will be published in the city's newspaper later that week. Secretly terrified at taking such a public stand on a controversial issue, he pushes on because he believes in the cause at hand. He owes it to his two small grandchildren.
I see the young mother of a toddler, missing bathtime once again so she can sit in the dingy conference room to plot with her colleagues how to recruit more volunteers for next month's restoration project. She'll return home, put her daughter to sleep, and spend the next few hours making good on the volunteer tasks she took on during that meeting.
I see a small group of three volunteers practicing soliciting each other for a donation during a fundraising training session, trying to get comfortable with the act of asking for money for a big project they're involved in. It feels awkward and uncomfortable and nerve-wracking and they repeatedly stumble through the words. They high five each other after finally pulling it off without faltering or nervously fidgeting with their hands.
I see a monument manager remaining steadfast in her willingness to make the right management decision for the land and the American public, even though doing so might sabotage the promotion she desperately wants and definitely deserves. The possible political repercussions are disconcerting, but she signs the document anyway.
I see a guy skipping dinner so he can make it a public comment meeting, wanting to weigh in with a few words about the invasive grass he sees climbing the desert slopes. A former botanist, he tells the audience that the grass could cause great harm to the ecosystem by carrying wildfire to hardy desert plants unequipped to recover from such an event. He's willing to organize his friends and others to remove it, even by hand if necessary—an activity he'll end up spearheading for the next seven years.
I see a bleary-eyed staffer from a conservation organization patiently assist, for the fifth time today, a volunteer struggling to understand the arcane intricacies of a thousand-page resource management plan. It's not what either had in mind when they first got involved. It takes serious resolve and tenacity for them both, but it's important to the places they each care about, so they persist.
I see a retired art teacher who now finds herself as treasurer for a friends group. She hates the actual work (she hasn't balanced her own bank account in decades), but took the position because no one else would and the job needed to be done. She now spends her mornings reading blog posts on becoming a better nonprofit treasurer, a habit even her close family is surprised by.
This is just a quick sample of the stories and people involved in these efforts. Individually, they may not seem like extraordinary or especially noteworthy examples. They're not. But collectively, it's a truly impressive. People from all walks of life, personal interests and hobbies, skills and experience, religions and political tribes, all sacrificing and working hard to bring the words "national monument" to life. I've been up close and personal with these stories for more than a decade and I can't overstate how inspiring they can be.
It's not hard to review any of the national monuments of the last 20 years—or just about any of those ever designated for that matter—and see why they're important places to protect. Unworldly landscapes. Critical wildlife habitat. Stunningly gorgeous scenery. Ancient artifacts and seemingly untouched pueblo ruins. We've been granted an amazing inheritance of public lands containing innumerable important resources.
But these places aren't just scenic destinations you scroll through on your instagram feed. They're deeply personal and important places to many who have toiled, sacrificed, and sweated to make them worthy additions to that revered inheritance we pass along to future generations. When you see these names on a map—when you visit them—remember that countless people worked to bring that place to you.
Thank you to all those wonderful people.
Kayaking the Blue Ridge Reservoir
FR751 from Red Rock Crossing campground to Blue Ridge Reservoir (aka C.C. Cragin) will be closed from September 10, 2018 until April 2019. For more info, call Mogollon Rim Ranger District at 928-477-2255.
Look on most maps of the Mogollon Rim region of Arizona and you'll have trouble finding a label for Blue Ridge Reservoir, one of the nicer lakes in Arizona to kayak. Instead, you'll run across a far less glamorous name, the C.C. Cragin Reservoir. This gorgeous narrow lake is located about 25 miles north of Payson, but only came into being because of water needs 200 miles away.
The lake that copper built
In the early 1960s, Phelps Dodge was looking for water to service its huge mining operation in Morenci. The most obvious source was the nearby Black River, but its water rights were tied up by the Salt River Project, better known as SRP. Phelps Dodge and SRP found a solution in a water trade. SRP would allow Phelps Dodge to use water from the Black River if the mining company delivered the same amount of water from outside SRP's existing service area. A site on the Mogollon Rim was selected to complete the deal.
By 1965, Phelps Dodge had constructed a dam on East Clear Creek an hour's drive north of Payson. The resulting reservoir—originally named Blue Ridge—held only 15,000 acre feet of water, but was surprising reliable given its location atop the Mogollon Rim. The project included an 11-mile long pipeline to deliver the water down the rim to the East Verde River, which eventually flows into SRP's reservoir system. It was an exchange that served both parties well for decades to come.

How 'Blue Ridge Reservoir' became 'CC Cragin Reservoir'
More than 40 years later, the Arizona Water Settlement Act of 2004 changed the name of the dam and reservoir to honor C. C. Cragin, a former SRP superintendent that helped greatly expand the system of dams along the Salt River east of metro Phoenix. The following year, Phelps Dodge handed over the reservoir to SRP, who now provides water to Payson and surrounding communities.
What's it like to kayak here?
Blue Ridge Reservoir is definitely a favorite of many kayakers in the state. The narrow, intimate lake is flanked by relatively steep pine-covered slopes, so it feels more like you're paddling a slow moving river than a broad lake. It's easy to feel like you're the only boat on the water here, as the lake curves around multiple bends just as a river does, obscuring other paddlers. With a treeline that comes right down to a 15 mile-long shoreline, the lake offers many opportunities to dock and enjoy a snack under the shade of the cool pines. Craggy rock outcroppings abound at the water's edge, offering plenty of geologic eye-candy while you paddle past.
The lake is split between two arms. The western arm is much longer, while the southern arm includes the interesting curved dam that holds the water back. At an elevation of 6700 ft, the paddling season runs from May through October. While small motorized boats are allowed, this isn't a place where paddlers will feel overwhelmed by motors.
How to get there
Blue Ridge Reservoir is located about 45 miles north of Payson, a roughly 2-hour drive from Phoenix. From Payson, continue north on Highway 87 for roughly 40 miles to FR751, near milepost 295. You'll see a large US Forest Service sign pointing the way to Blue Ridge Reservoir (as with most paddlers, the CC Cragin name hasn't quite taken hold). Turn east on FR751 and follow it about 4 miles to the boat ramp.
Parking at Blue Ridge Reservoir

One of the appealing qualities of kayaking on the Blue Ridge is the narrow, river-like canyon of the reservoir. Unfortunately, the same narrow width applies to the approach road, boat launch, and available parking area. You won't find a large paved parking lot capable of storing dozens of trailers here. Indeed, there are only a handful of legal spots clinging the guardrail near the top of the boat ramp loading area, with a small parking lot up the hill for the remainder of the vehicles. Parking is currently prohibited anywhere else along the road. In short, expect an uphill walk after your paddle to retrieve your vehicle. I recommend either arriving early in the morning or late in the day to claim a parking spot.
Camping near Blue Ridge Reservoir
The Rock Crossing Campground is just two miles from the reservoir boat launch, so it's well placed for a weekend of boating. It's a popular place during the summer months and no reservations are accepted, so you'll want to have a backup plan in case it's full. Blue Ridge Campground and Clints Well Campground are the next nearest options, each a 10 minute drive away.
In addition, dispersed camping is available throughout the surrounding national forest, so you shouldn't be without some sort of campsite to call home for the night. There are a handful of spots that work for shoreline camping from your kayak or canoe, if you're feeling adventurous.
Driving the Black Hills Back Country Byway

There it was—an obscure, thin black line on a map, a 21-mile dirt road shortcutting two sections of Hwy 191 along the eastern edge of Arizona: the Black Hills Back Country Byway. I had first noticed it when I was inspecting the map for the Gila Box Riparian National Conservation Area, one of the state's many National Conservation Lands. The road subtly poked into the Gila Box, providing a popular put-in spot for rafters down the Gila River. I wasn't here to raft the river though—at least, not yet anyway.
Arizona Highways had included the route in its listing of scenic drives in the state, so I had been attempting to work it into various trip itineraries for quite some time. On the return journey from southern New Mexico last weekend, I found my opportunity.
As we made our way north from the settlement known as "Three Way" [insert giggling], we wondered if the basalt-covered hillsides to the west were the black hills after which the road was named. We searched online for a detailed map of the backcountry byway, but—as is often the case these days—the BLM website was not forthcoming. After a bit of searching, we discovered that the 'Guthrie' and 'Toll Gate Tank' topo maps seemed most useful quads for navigating the route, and the Gila Box Riparian NCA map probably gives the best overview. Having a map isn't essential to this endeavor, as the main roadway is well defined and the turnoffs are well signed, but it's always a good idea when you're traveling in the backcountry. While high clearance vehicles are recommended by BLM, I'd consider the road passable under dry conditions by most sedans. Nonetheless, this area is remote and you should be fully prepared with extra water and emergency gear before attempting this or any backcountry drive. Not including stops, you'll need roughly 60-90 minutes to drive from end to end. You can access the Black Hills Back Country Byway off US Highway 191 near milepost 139 east of Safford and near milepost 160 south of Clifton. Both ends are well-signed and feature an informational kiosk a short distance up the road.
The Black Hills Back Country Byway isn't a knock-your-socks-off scenic drive, but it is definitely a worthy detour if you're passing through the area.
The byway follows the old road between Safford and Morenci built in the 1930s. There are a handful of interpretive sites and picnic areas along the way, as well as access to several rugged roads penetrating more remote areas. One of those side roads accesses the Black Hills Rockhound Area, where you can try your luck at taking some gems home. You'll also cross the historic Old Safford Bridge over the Gila River (built in 1918 and listed on National Register of Historic Places, but more recently renovated), which offers a great spot to stop and enjoy the river and the resulting shade. The 7-site Owl Creek Campground is on a bluff overlooking the bridge and riverway for those who want a longer experience.
The Black Hills Back Country Byway isn't a knock-your-socks-off scenic drive, but it is definitely a worthy detour if you're passing through the area. It's a rather pleasant drive through the backcountry of southeastern Arizona. The view from the Canyon Overlook Picnic Area overlooking the surrounding topography with Mt Graham looming in the distance is definitely camera-worthy. And the thin ribbon of lush green riparian vegetation along the Gila River also begs for an extended stop. The scenic drive would be a perfect compliment to any journey down the famed Coronado Trail.
Five ways to keep cool while hiking in the desert
One of the keys to desert hiking is staying cool. The most obvious way to do this is to limit your desert hiking to the cooler months. But for some places, there aren't exactly many "cooler months" to begin with. As someone who has spent my own fair share of adventures in the triple-digit heat of the Sonoran Desert, here are my five go-to tips for staying cool in the summer heat.
Bring your own shade
Part of the reason it feels so hot to hike in the desert is that there is often little shade. The constant pounding of the sun can really wear you down. The easiest way to avoid this is to bring your own shade. And the easiest way to do that is to carry an umbrella. Umbrellas are great because they keep your skin and clothes cool, and they can help you avoid sunburn. Even if you don't want to carry one while you're actively hiking down the trail, they're great for creating some temporary shade during breaks and lunch.
A couple quick notes on umbrellas. Don't worry so much about buying an expensive umbrella made especially for trekking. They work slightly better to reflect sunlight and are a bit lighter; but for most people, I don't think they're worth the extra money. The desert is full of things that poke, snag, and stab—and you shouldn't be surprised to find a tear in yours at some point. It's a good idea to bring some duct tape on any outdoor adventure you take, and this is just another one of those reasons.
Stay covered
It might be counterintuitive to those visiting the desert to catch some sun, but you'll stay cooler by covering up rather than stripping down. Again, it's all about keeping the sun off your skin. The best endorsement you can find for this is from those that spend their workday outside. Drive some neighborhoods and see what the folks doing landscaping work are wearing. Invariably, you'll find they're donning lightweight long pants, loose long-sleeved shirts, and either a wide-brimmed hat or (especially if it's windy), a baseball cap over a bandanna that's covering their neck and ears.
The added benefit of this approach is that you don't need as much sunscreen (you'll still need it for exposed skin like your face and back of your hands), which most people don't reapply nearly often enough anyway. And as mentioned above, the desert is full of things that poke and scrape; after wandering through the brush, you'll appreciate the long pants and long sleeves. Trust me on this.
Get wet
The first rule of hiking in hot weather is to bring far more water than you think you'll need.
Don't break this rule.
One of the best ways to stay cool is to dampen what you're wearing. I use the extra water I've brought with me to do this regularly throughout the day. I add some water to the inside of the hat I'm wearing, letting it soak through to the outside before tossing it back on my head. If you have a quick-dry hat, you might want to toss a cotton bandanna inside to capture and hold the water longer. You can also wet the bandanna and drape it across your neck.
Ice your water
Not all of that extra water needs to be in a drinkable form, however. I often like to freeze a water bottle or two the night before a hot weather hike. You can use these as ice blocks in your pack to help keep your lunch and/or snacks cold (side note: a frozen snickers bar is an amazing snack in hot weather).
Feeling a bit hot? Take a break and snag the frozen water bottle from your pack. If your hike goes long and you start to run out of water, this becomes a very nice backup option as it melts. Otherwise, toss it back in the freezer when you get home and it'll be ready for next time.
You can also add ice cubes to the water bottle (or water bladder) you'll be drinking from. I usually transport my water to the trailhead in a cooler to help keep it as cold as possible before starting the hike. I also keep some cold water (as well as a post-hike beverage, like a soda or a "yay we did it!" trail beer) in the cooler, along with a snack that'll help cool me off. There's nothing like arriving at your car after a hot hike to find a cold beverage.
Time it right
Finally, when you hike is an important consideration during the hot summer months. Early morning is the best time to be on the trail, followed by after the sun starts to set. The desert is really alive at night, and not much wildlife will be out in the middle of a hot day. You shouldn't be either. Bring a headlamp and explore the desert at night—just remember, it's harder to navigate in the darkness, so be prepared.
Most of my mid-week summer hikes involve hitting one of the mountain preserves here in Phoenix right after work and just before setting sun. You get the gorgeous sunset, get to watch the desert come alive, and get to see the city lights at the summit before you head back down. And since the desert breeze kicks up around dusk, your hike will be far more comfortable than it would have been just two or three hours earlier.
Have another tip for staying cool? Tell me in the comments!
The best way to find secret Indian ruins in your state
The West is littered with cultural artifacts of Native American peoples—pueblo ruins, petroglyph panels, tool-making sites, and plenty of others.
There are hundreds of these sites that are well-known and publicly interpreted, usually in national parks, state parks, national forests, or on other public lands.
And then there are a host of other ruins and sites that aren't publicized, but—especially in the age of the Internet—are still easily located with some basic research.
And then there are the secret sites. The confidential ones. These aren't the ones you'll find listed in guidebooks or on a blog post, and they may not even be well known by the land managers themselves. Their locations are often obscured, even in archaeological literature.
How to find the secret sites
There is a way to learn of these secret sites, however. It requires a bit of work, but it's very rewarding and educational. And you'll be giving back to the public lands you love. Here's how:
Become a site steward.
Site stewardship is a relatively new phenomena on or public lands, but it's a powerful one. It's one of the most rewarding volunteer opportunities I've participated in.
What does a site steward do?
Simply put, a site steward is a trained volunteer that monitors a specific set of archaeological resources. They regularly visit the sites in their portfolio, looking for the signs of damage and trying to head off future negative impacts. They serve as the eyes and ears of land managers who are often understaffed and increasingly office-bound.

The benefits of being a site steward
The main benefits of being a site steward come down to two words: access and knowledge.
Site stewards are not only given detailed information about the archaeological sites they monitor, but also learn about many other sites in the program. In addition, archaeologists often utilize site stewards in special projects, everything from inventorying areas for artifacts to helping to record rock art to conducting research.
In addition, strong communities often form around the programs, providing some serious opportunities for networking and learning.
When you're accepted in a site steward program, you'll receive some basic training. Here in Arizona, that means a half-day of classroom instruction followed by a half-day field visit.
In addition, there are annual site steward conferences, plus other archaeology conferences and other special events. All together, these educational opportunities will completely expand and enhance the way you recreate on our public lands.
Site steward programs
No site steward program in your state?
Not every state has a statewide site stewardship program, but some states not listed above have partial programs. You can also contact one of the federal land managers, such as the US Forest Service or the Bureau of Land Management, to see if they have active programs in your area.
If you still aren't having any luck, don't despair. Para-archaeologist organizations like the Arizona Archaeological Society offer similar training, networking, and volunteer opportunities. You can attend conferences and guided trips with organizations such as the Utah Rock Art Research Association and American Rock Art Research Association. And other organizations, like Archaeology Southwest, National Trust for Historic Preservation, and the Crow Canyon Archaeological Center advocate on behalf of cultural resources on public lands and have a variety of programs to get involved. A few google searches will likely find a similar organization in your neck of the woods.
The photo of "Hidden Bird" petroglyph site in Agua Fria National Monument, which is monitored by the Arizona Site Steward volunteers, is courtesy of the stellar Bob Wick of BLM.
Walking behind a waterfall at Horseshoe Dam
Overview
Located just outside the metro Phoenix area, there's a surprisingly cool waterfall that flows during the rare occasions when water is being released from Horseshoe Reservoir. The best part of this easy-to-get-to adventure is that you can walk behind the waterfall along a concrete walkway.
When to go
The "waterfall" only occurs when water is being released from Horseshoe Reservoir, one of several dams storing and delivering water to metro Phoenix. Unfortunately, large releases from Horseshoe Dam aren't that common, usually only occurring during wet periods when the system can't safely store any additional water.
That means that you'll need to pay close attention to conditions to catch it at the right time. If you see someone post a video or photo of the waterfall running, I'd hop on the chance to get there.
Your best bet is to check the SRP daily water report when you think there might be a release happening. Select today's date and look for the Reservoir Release section about halfway down. If you don't see Horseshoe Reservoir listed (it's currently highlighted in a little yellow box below the section), then you're out of luck. As you can see from this screenshot, the release was 425 cfs in the photos and videos you see here.

Getting there

The parking area is located about 24 miles from Carefree, Arizona. The road is about half paved and half good gravel or dirt. There are numerous potholes that blend in with the dirt, so pay attention and take it slow. If you're careful, you can make it in a sedan, though you'd probably be more comfortable in an SUV. There is one short section—maybe 20 yards long—that is quite rocky; be sure you go slowly over this section in particular.
Starting at the corner of Tom Darlington (Scottsdale Rd) and Cave Creek Rd in the town of Carefree, head east for a little over 6 miles. Turn right onto Bartlett Dam Road/FR205; you'll see signs for a ranger station and Bartlett Dam. You'll take this road for 6.25 miles until you see a well-signed road heading left (north) for Horseshoe Reservoir. Turn left onto this road and follow it for 10.5 miles.
You'll then want to turn right onto a well-maintained road signed for Horseshoe Dam Vista. Follow that for nearly half a mile until you reach the parking area. From the parking area, you'll be faced with two roads in front of you. The one on the right goes to a great viewpoint of the dam and the waterfall. The one on the left goes to a higher viewpoint, and is where you access the walkway behind the waterfall.
I've embedded a google map below with the route and some points of interest. You can clearly see the parking area and the viewpoints you'll want to see. You can even open this map using the Google Maps app on your phone to follow along.
Do you need a Tonto Pass?
Along the way, you'll see many signs telling you that you need a Tonto Pass. Sadly, an "interagency" pass, such as the America the Beautiful pass, does not count—that pass doesn't cover areas with "enhanced amenities," which is how Tonto National Forest gets away with not accepting the interagency pass. If this frustrates you as much as it does me, check out this organization that's leading the fight against additional fees.
The area that you'll be parking in does not have the elements required by law to qualify as an enhanced amenity area, but Tonto National Forest may disagree and ticket you anyway if you don't have one. I keep an unused one in my vehicle, so I often play-it-by-ear when I'm in an area that doesn't seem to qualify but is signed inappropriately. This is your decision, not mine, so don't blame me if you get a ticket.
What you'll see
I suggest starting with the viewpoint found on the road to the right from the parking area (point 3 on the map). This is the best view from this side and gives you a good overview of the scene.
From there, you can backtrack to the parking area and take the higher road on the left, or find one of the paths that leads up the slope to the higher road near where you're already at. From that viewpoint (point 5), you can clearly see the entrance to the walkway in front of you.
Once you're behind the falls, watch where you're walking—the footbed turns to gravel and puddles about halfway through. It's pretty relaxing to stare out as the water falls down in front you, separated into streams by debris barriers above you. The roar of the water is quite loud, and there's quite a bit of mist and some water dripping too.
Keeping walking and you'll find yourself on the other side of the dam. There's a sloping path up (point 6) to a viewpoint (point 7) that provides an interesting perspective looking back towards where you started. There are a number of cascades and smaller falls facing you, as the water finds its way down to the river channel below.
From here, you can make your way down the slope closer to the water for a slightly different view. Be careful, it's a steep slope that can get wet and slippery from the mist.
You can also make your way back towards the damn, arriving just below the walkway right where the water falls onto bare rock (point 8). The force of the water is very apparently from this vantage point.
When you're done exploring, head back the way you came—back up the slope, across the walkway, and back to the original vista point.
For an additional view of the runoff, follow the very rough road downstream that leads you to Fishermans Point. From here, you can wander out onto the rocks (point 9) for a good water-level view up towards the dam.
Before you head back to the city, you might want to explore more around this gorgeous area.
If you found this guide useful, please do me a favor and share this on social media or send the link to a friend. I appreciate it!
A moment of serenity at Pictured Rocks National Lakeshore
Sometimes, you just need a minute or two away—to recollect, to destress, to center yourself. To forget about the annoyances of the moment.
Here's an opportunity to do just that.
So sit back, put in your headphones, click the fullscreen button, and enjoy the late afternoon shoreline of Pictured Rocks National Lakeshore.
The Little Ruin Canyon of Hovenweep
Hovenweep National Monument doesn't get much fanfare. It's hard to live in the shadow—almost literally—of nearby world-famous Mesa Verde National Park. It's also hard to compete with the sheer number of cultural sites protected by Bears Ears National Monument and Canyons of the Ancients National Monument, both next door neighbors to Hovenweep. At only 784 acres, it's among the smallest national parks in the West, and a little bit out of the way for many travelers.
But it's the quaint nature of Hovenweep's aptly-named Little Ruin Canyon that really shines for visitors.
Behind the visitor center, an easy 2-mile loop brings you close to each of the canyon's major ruins: Tower Point, Hovenweep Castle, Square Tower, Hovenweep House, Rim Rock House, Twin Towers, Stronghold House, and Unit Type House. The canyon is small and feels homely—you can easily see across to the structures on the opposing rim. And the scale of the ruins here, known as the Square Tower Group, really makes it easy to imagine each as its own house on an ancient neighborhood block.

The Ancestral Puebloan people (often called the Anasazi until recently) who inhabited this canyon left behind countless ruins, rock art, and other artifacts in the Four Corners region. While the stunning Mesa Verde and Chaco Culture are among the best known parks preserving the remains of this culture, Hovenweep provides visitors with a different experience.
Whereas the sheer scale of Chaco's sprawling Pueblo Bonito or the massive Cliff Palace of Mesa Verde tell the story of great cultural centers, Hovenweep's story seems far more intimate. In some ways, it's like comparing Manhattan with a sleepy suburban neighborhood. One has the glitz and glamour, but the other excels at its relatability.

That even holds true with Hovenweep's small campground. Featuring just 31 sites—but equipped with curved shade structures and graveled tent pads—the small campsites give off a comfy, yet cozy vibe. There are even delineated trails thoughtfully placed from each campsite to the central restroom facility, which features flush toilets and running water. Not bad for a $10 stay.
When we camped there on a Friday night in March 2017, only three of the sites were occupied. And the occupants of each were fast asleep not long after dark.
That's too bad really, because the night sky is one of the best features of the park. In 2014, Hovenweep was designated as an International Dark Sky Park, a testament in part to the park unit's remoteness.
There's more to Hovenweep than just the canyon and campground, however. The national monument also boasts four outlying parcels—Cajon, Cutthroat Castle, Holly, and Horseshoe/Hackberry—each containing additional related ruins.
In short, Hovenweep is a great destination for avoiding the park crowds, visualizing what life might have been like for this community of Ancestral Puebloans, and enjoying an interesting and intimate little slice of the Four Corners region.
The secret about National Park visitor center restrooms
If you've been to quite a few National Park units—especially the ones that don't close at night—you may have noticed something odd about the layout of their visitor centers. In nearly all of them, the public restrooms are located on the exterior of the building, as opposed to down an interior hallway inside the visitor center. There are exceptions to this, certainly, but it's prevalent in the types of national parks where visitors are coming and going after hours, especially ones with a campground.
Because they're accessed from the exterior, these restrooms are open 24 hours a day, 7 days a week—even when the visitor center itself is closed.
That's a great tidbit to know, especially if you're camping in the park's campground or on nearby public lands.
Upgrade your park camping experience by making a stop at the visitor center restroom.
Unlike the available facilities at many park campgrounds, the visitor center restrooms will have flushing toilets, sinks, and even mirrors. And since they're often cleaned right after closing, you'll usually find them freshly stocked with paper products and in spic-and-span condition. You'll usually find a water spigot there, too.
This last weekend, Jen and I camped at Natural Bridges National Monument in southern Utah. The park campground is small and a bit sparse in amenities—there's no drinking water and only two pit toilets are available.
That might not sounding like a particularly appealing campground to some. But don't let that keep you from staying there.
It's a short walk down the park road to the visitor center restrooms, where you'll find flushing toilets, sinks and mirrors, and fully stocked paper products. And did I mention that the floors will have been freshly mopped?
And since few people seem to make use of these restrooms after hours, you'll likely have the place to yourself. We certainly did this weekend.
Keep in mind that many state parks and other recreation areas also have "always open" restrooms attached to their respective visitor centers, too.
So the next time you feel skittish at the thought of using a campground pit toilet, consider making a stop at the visitor center on your way to the campground each night (or morning, or both).
A day spent exploring the Kofa
After having our weekend camping trip get cancelled, Jen and I decided to salvage our Sunday with a day trip west towards the Colorado River. Our goal was to explore the Kofa National Wildlife Refuge a bit, check out the desert wildflower scene there, and scout a few places to camp in the future.
After packing up the car with our gear, snacks, and picnic supplies, we hit the road for the 2.5-hour drive to the western approach of the Kofa Mountains. The entire low desert region around the town of Quartzsite, Arizona is prime RV camping in the winter months. The BLM public lands surrounding the town, and those that ring the Kofa, allow for long-term camping, so the desert flats are filled with both trailers and coaches, as well as the occasional #vanlife rig.
Kofa is a rather large place. It's 665,000 acres of rugged mountain ranges and sloping valleys, all but one-fifth of which is designated Wilderness. The land was originally set aside to protect desert bighorn sheep back in 1939, the product of a Boy Scout advocacy campaign to protect the species. Mining, however, has seemingly always been a part of the modern history of this area. The name Kofa comes from the King of Arizona mine located along the mountain range's southwestern edge.
The spiral labyrinth

Our first stop of the day was just outside the National Wildlife Refuge's official boundary at a feature called the spiral labyrinth. I have no idea when it was constructed, who made it, or why. I'm not exactly a fan of mutilating the desert with something like this, but I'll admit that it's a lot cooler than I expected it to be.
The labyrinth is located just off the main road into Palm Canyon and is scraped into desert pavement, much like the ancient intaglios further west. At more than 60 feet wide, the spiral is impressive—especially given the quality of its design and construction.
I would have loved to stay here for much longer than we did and to walk the entire thing. Unfortunately, two inconsiderate asshats were camping right next to the thing, preventing us from taking the photos we'd like or even enjoying a serenity.
Queen Mine Road
Moving along, we entered the refuge and turned onto Queen Mine Road. The road is quite a bit rougher than Palm Canyon, as it eventually leads into a tight canyon where it dead ends. Thank goodness I have Sam the Subie. I've always wanted to camp along this road, which is home to a somewhat iconic photo spot, sometimes called the Kofa spires or Kofa sea stacks. It's also the approach one would use for scrambling up Signal Peak, the highest point in Yuma County. I'll be back to tackle this summit another time as part of my Arizona County High Points quest.
Palm Canyon

We doubled back and headed towards Palm Canyon for lunch. Palm Canyon is the most common destination for visitors. It's incredible easy to find—the main sedan-friendly road into the Kofa leads directly to it. It's also a signed half-mile foot trail, which means it's usually the only Kofa destination that you'll find on hiking websites or guidebooks. The canyon is home to the California fan palm, the only palm species that grows natively in Arizona.
We positioned the car to block the wind, made some sandwiches and enjoyed the vista. After lunch, I scouted around the mouth of the canyon for some tent-appropriate campsites we could use on a future group trip. And yep, there are some primo sites with great views into the canyon. We'll definitely be back.
King Valley
It was now time to explore the expansive King Valley, which bisects the wildlife refuge and separates its two primary mountain ranges: the Kofa Mountains and the Castle Dome Mountains. We headed back to the highway and down to King Road, then took it southeast into the interior of the refuge. Passing countless camp pull-offs and expansive vistas, we eventually headed northeast over the desert flats towards Polaris Mountain and the Kofa Mine. It was late afternoon by the time we arrived at the foothills, so we couldn't stay and explore the area on foot.
A stop in Yuma

After departing the Kofa, we turned south towards Yuma. On our way, we stopped at the Yuma Proving Ground, a large military testing installation. The proving ground, still currently in use, is a remnant of General Patton's massive Desert Training Center. An interesting note on the national wildlife refuge: in times of war, it can automatically revert to active Yuma Proving Ground land.
There are a dozen or more old tanks on display outside the main gates—each of which was originally tested on the facility grounds—so I stopped for Jen to take a look and read the various plaques.
Our purpose in heading out of our way to Yuma was simple: beer. Jen has officially adopted #azbeerquest and had not yet marked off Yuma's sole craft brewery. This must be corrected. But first, we needed to stop at a dive bar that's been on my list to visit for several years. It didn't disappoint. I even had to fight off some handsy (and apparently quite lonely) locals looking to get frisky; I suppose that's what you get at a former strip club.
We departed to grab dinner and a beer flight at the brewery and mark another off the quest. After a long but enjoyable day, we headed towards home, completing an impressive loop around southwestern Arizona.
Day trips rock!
I'm always a bit surprised when a friend seems shocked that we'd did a day trip like this one. I sometimes get questions like:
"How did you know where to go?" or "How long did it take you plan that trip?" or even "I could never just go do something like that."
Let's just set the record straight: day trips rock!
They're easy to put together and they're easy to do. They allow you to get out and explore your state. And if you bring food along with you, then they only cost a tank of gas. Don't have a destination in mind? Don't let that stop you. Grab a map, hit the road, and decide as you go. Don't know what to bring? Just bring whatever you want to have with you. I'd recommend some water, beverages and snacks, and warm clothes if it's cold out. Besides that, there's really not much to it.
Stay tuned here and we'll help ensure that you start taking more of those day trips and just get out more.
Always remember the path back to the important places
Child of mine
come as you grow
in youth you will learn the secret places
the cave behind the waterfall
the arms of the oak that hold you high
the stars so near on a desert ledge
the important places
and as with age you choose your own way
among the many faces of a busy world
may you always remember the path that leads back
back to the important places.— Dad for Forest, 1986
This short poem inspired the excellent short film above. It's a poignant re-telling of how the poem inspired a return trip, and it highlights the role that our public lands play in our collective lives. Of how those shared experiences—even ones separated by decades—can help make us feel at home and connected to the ones we care most about. Our important places help us create, and later relive, our cherished memories.
If you haven't made it back to the important places of your life recently, maybe it's time to change that.
25¢ pony rides
What do you do when you're driving a backcountry dirt road near the Mexican border—miles from any city—and you come across an offer you just can't refuse?
Well, I think we all know the answer to that...
What are National Natural Landmarks?
While perusing a state map, you may have run across an area listed as a National Natural Landmark. There are about 600 such sites spread throughout 48 states and several territories, but not many people understand what these designations mean. After reading this short post, you'll know more than most. From Wikipedia:
The National Natural Landmarks (NNL) Program recognizes and encourages the conservation of outstanding examples of the natural history of the United States.
It is the only national natural areas program that identifies and recognizes the best examples of biological and geological features in both public and private ownership.
The National Park Service administers the program, but that doesn't necessarily mean they manage the land. NNLs are designated irrespective of land ownership—whether that's a federal entity, state entity, indian reservation, or even a private individual.
Participation in the program is completely voluntary, and does not convey any intention for federal acquisition. It is not a precursor for national park status. In fact, the NNL designation does not even transfer to the new owner if land ownership changes!
While many would assume that inclusion in the program would provide some level of resource protection, it's sadly not the case. Participation does not include any encumbrances or limitations on the property whatsoever. Similarly, there's no requirement for NNLs to be open or accessible to the public—and many are not. In fact, the National Park Service does not even provide a plaque for each area included in the program.
In short, National Natural Landmark status shows that a place is important, but does virtually nothing to ensure that those natural resources aren't degraded.
Nonetheless, the system does include some really amazing areas—from the La Brea Tarpits in LA to the Diamond Head Crater on Oahu to the under-appreciated Joshua Tree Forest in northwestern Arizona. All places worthy of a visit.
So be sure to consult the national NNL listing before you finalize your next road trip. Don't believe me? Check out the NNL photo contest for some instant inspiration.
The single best way to save money on travel
Travel can be very expensive. But it doesn't have to be.
There's one simple way to save money on your trips:
Camp.
Yep, not an earth-shattering secret, I know. But it's still a powerful way to travel. Not only does it allow you to experience the local environment in a more intimate way, but it allows you to save some serious bucks along the way.
By camping instead of staying in hotels, you can often save enough to extend your trip by 30% or more. That's huge.
If your goal is to travel cheaply enough to afford an additional vacation or two this year, camping might be the answer.
A fraction of the cost
I never stay at the high end resorts or hotels, but I usually try to avoid the bottom-barrel motels, too. For me, a clean room and preferably a good pillow is what I'm looking for. That means that I'm routinely spending $75-200 a night on a room. That adds up quickly, especially considering how little time I usually spend in the room.
By contrast, camping is a fraction of the cost. Campsites at developed campgrounds usually run between $15-45 or so, with full service RV campgrounds starting around $50. And you can also camp for free in dispersed campsites in most national forests and BLM public lands—that's tens of millions of acres where you can sleep for free.
To put some numbers to it, here's what a stay in Grand Canyon National Park would cost you for a 3-night, mid-week trip over July 10-13, 2017. The cheapest hotel currently available on hotels.com is a nice 3-star Best Western in Tusayan, about 6 miles from the park boundary.
Best Western in Tusayan: $270/night ($810 total)
Mather Campground: $18/night, ($54 total)

➞ Savings: a whopping $756
Maybe this is a bad example, and you'd be cool with staying 60 miles away in Flagstaff where you might be able to snag a $120 hotel instead. Ok, fine. But you'd still be saving $300 by camping. And you'd be within walking distance of the sunrise or sunset over the canyon. And yes, you'd still have flushing toilets and showers, plus a picnic table and fire ring—and even a free ranger campfire program.
It's not just about not paying for a hotel
The most obvious expenditure you'll save by camping is on hotel bills. For my travels, that's usually the highest cost. But camping provides another possible cost-saving measure: the ability to cook your own meals.
Cooking for yourself will undoubtedly save you gobs of cash. Sure, it's much more work to cook for yourself. But if you're looking to save money, this is another great way to do that.
Don't want to cook? No worries, you can just as easily eat out and head back to camp whenever you're ready to unwind and go to bed.
Speaking of unwinding, is there anything better than an adult beverage around a campfire? Yeah, that's a lot more fun than drinking in the hotel bar or alone in your room.
Camping isn't always an option
Granted, camping won't always be an option. If your goal is visiting Manhattan...well, camping probably isn't a particularly viable choice. But it does work for a surprisingly large subset of America, especially when you're on the move between places.
Weather plays a major consideration as well. I don't recommend camping during your summer swing through Phoenix, for instance—though you could camp an hour north in the cool pines of the Mogollon Rim without any issues. Likewise, camping in extreme cold or snow offers other unique challenges that you might not want to deal with.
On the other hand, lodges in popular national parks often sell out weeks or months before the campgrounds.
Camping does require an initial investment
Now, you'll need at least some gear to make camping a reality. But you probably don't need as much as you think. Even better is that after that initial your gear will last years and years, reducing the cost of future trips.
The most basic gear needs:
- tent
- sleeping bag
- sleeping pad
- headlamp
You don't need the very best of these, though the more you spend the better gear you'll get. But for occasional use, some of the cheapest models you can find at Wal-Mart or on Amazon could be perfectly functional for your needs.
And you don't actually need a tent, or a sleeping bag, or a sleeping pad—you just need to accomplish the same function. You can use your own blankets as a sleeping bag, or a foam mattress topper as a sleeping pad, for instance. And I often sleep in the back of my Subaru Outback instead of pitching a tent.
You can also rent gear from places like REI, or simply borrow it from friends. In fact, that's probably the best way to get started.
The other benefits of camping
Saving money—often in order to extend my trip—is usually my primary motivation for camping during road trips. But there are quite a few additional benefits of camping you shouldn't overlook.
- Camping provides a more intimate connection to place. You'll learn more about your destination by spending time in its native environs.
- It's also good to disconnect from screens, and it's good to see the stars once in awhile. Disengaging from the digital world can refocus your mind on more important aspects of life—not just how many likes your last instagram post has gotten.
- Camping also fosters deeper personal connections with your traveling companions. Shared experiences such as camping create stronger memories and nurtures relationships.
But probably the most obvious benefit is the flexibility it provides. When you're self-contained, your schedule has a bit more give in it and you're not quite as locked in to your initial itinerary. So if you run across something unexpected that you really want to do, you can. And if you're not enjoying where you're at, you can move along to a new destination.
Stay tuned
You'll read quite a bit here about camping, including both tricks and gear to make your time outside that much better. So don't worry if you're not quite an expert just yet. I'll help you get there.
National Conservation Lands: a series of underappreciated destinations
Our National Parks are often—and justly—referred to as crown jewels of our nation's public lands. They are simply amazing slices of our public lands.
But BLM's National Conservation Lands are among the least heralded and most underappreciated protected landscapes in the country. Many even rival the national parks we love so much.
The newest system of protected public lands
BLM (occasionally referred to by its full name, the Bureau of Land Management) traditionally wasn't known as a federal public lands manager with a strong commitment to conservation. But after the establishment of the National Landscape Conservation System—what we now call the National Conservation Lands—in 2001, that's starting to change.
More than 36 million acres, or about 10% of BLM's vast holdings, are now part of the system. That includes 27 national monuments and 22 national conservation areas (or similar designations), plus hundreds of BLM-managed wilderness and wilderness study areas. The system also includes the BLM-managed stretches of wild and scenic rivers and national scenic and historic trails. Needless to say, there's something for everyone in the National Conservation Lands.
If you're not familiar with the system, don't worry. I'll be writing about the National Conservation Lands here quite a bit.
A different kind of experience
Most areas in the National Conservation Lands offer a far different experience than the national parks. The vast majority have no visitor center in the unit, nor the regular ranger-led tours or programs. There aren't many visitor services to be found, and often not much interpretation either.
This lack of development allows for a much different visitor experience. Instead of being led down the path, visitors are forced to rely on their own preparation. That means you get to interact with the lands in a more intimate way. Instead of staying on the gravel trail and behind the fence, you can walk right on up to the pueblo ruin. You can pick up (and put down!) the pottery sherds, inspect the rock art up close (but don't touch it!), and generally experience the place on your own terms. Well, as long as you plan head at least.
Add these places to your bucket list
For now, you should immediately include these places in your to-visit list. Seriously, do it now. Right now.
- Grand Staircase-Escalante National Monument (UT)
- Gold Butte National Monument (NV)
- Agua Fria National Monument (AZ)
- Vermilion Cliffs National Monument (AZ)
- Rio Grande del Norte National Monument (NM)
- Bears Ears National Monument (UT)
- Red Rock Canyon National Conservation Area (NV)
- King Range National Conservation Area (CA)
- Canyons of the Ancients National Monument (CO)
- Black Rock Desert-High Rock Canyon Emigrant Trails National Conservation Area (NV)
As you travel the country in search of our nation's most important natural and cultural resources, make sure that you include the National Conservation Lands.
If you'd like to support the National Conservation Lands, please check out the Conservation Lands Foundation, and as well as the local groups in their network. The Wilderness Society also plays an important role nationally in defending the system.
5 surprising things to carry hiking in the desert
If you’re relatively new to desert hiking, you may be a bit surprised at these five items you’ll routinely see on the trail.
Umbrella
I bet you'd see more umbrellas hiking in sunny weather on desert trails than when it's raining. That's because umbrellas are a great way to provide some portable shade during your hike. They notably make lunch breaks far more enjoyable. Don't worry about getting an expensive ultralight one—chances are high that various pokey desert plants will add a rip or two after a few trips out. Cheap ones work just as well.Comb
There's not much need to comb your hair during a desert hike—especially if you're wearing a hat. So why would I recommend carrying one in your first aid kit? Two words: cholla cactus. The comb is king when it comes to removing the fierce cholla that inexplicably snagged your leg. Just be careful not to fling it onto anyone else. The pliers in a multi-tool can work well, too.Foam gardening kneeling pad
Unlike forests, where you're bound to find an occasional fallen log or tree stump, the desert offers few comfortable places to sit down. A high density foam gardening pad solves that. Leave your Crazy Creek or blow-up sit pad at home—they won't last long in this sharp environment. Foam gardening pads are cheap and small enough to carry in your pack. Once you enjoy a comfortable rest on one while you watch your hiking partner wiggle and squirm trying in vain to get comfortable on that awkward rock, you'll never leave it at home.Long-sleeved shirt and pants
This won't be a surprise for any veteran desert hiker, but it might be for out-of-towners expecting to get some sun on their hike. Save the tanning for the pool instead. Smart desert hikers wear light, loose-fitting long sleeve shirts and long pants. Not only do these keep you protected from the sun's intense rays (and save you from reapplying sunscreen throughout the day), but it also saves your arms and legs from unnecessary cuts and scrapes from spinet and excessively "friendly" desert plants. Trust me here, you'll appreciate it.Gloves
If any scrambling might be involved in your hike, be sure to bring some gloves. The harsh rocks in the desert can easily cut up your hands. Oh, and they can get rather hot, too. Yes, your hands will get sweaty—but the glove-free alternative is worse.What other surprising items do you bring on desert hikes?
Let me know in the comments.How to get your phone ready for your trip
The big trip you’ve waited for all year is nearly here. You finished the big work project just in time so you can relax and unplug while you’re gone. You’ve dialed in the itinerary so you don’t miss out on anything important. You’ve even cajoled your friend into feeding your cat.
Now it’s time to get your phone ready. A few minutes of prep time can make your trip much better. Here’s what to do.
One screen for your trip
If you're anything like me, you have a myriad of various apps on your phone, occupying many folders and screens. You probably have them perfectly organized for your daily life in the city. But that means that the airline app is buried, and so is that star gazing app you hope to make good use of.I like moving all of the apps I expect to use on my trip to one single screen—far away from the others I won’t be needing. Not only does this make it so much easier to access what you want when you need it, but it also helps reduce the temptation to get distracted on something other than your trip. Doing this also makes it easier to delete any trip-specific apps once you get home, since they’re all right there for you to see.
Silence notifications
I find it to be good practice to temporarily turn off notifications for some specific apps while I'm on vacation. I like setting a strong boundary between work time and vacation time, so for me, this means turning off work-related email and social media notifications and letting my autoresponders function as intended. That way, my phone doesn't highjack my attention or create undo stress when I should be enjoying the moment.More recently, I’ve also turned off many other notifications as well—simply because I don’t need the distraction. I don’t need to see how many people liked that last photo on instagram, or be alerted that someone has connected with me on linkedin, or that one of my contacts just posted a new article on Medium. Sure, this can take a few minutes to do (and later undo, at least if you find you actually need all of them), but it can really help keep you focused on the task at hand—enjoying your current adventure.
Prep for off-line status
It's always a good idea to think ahead and plot out what items you might need to access before you unexpectedly lose coverage. Here are some of the items I make sure I have available:- Off-line maps, whether that's Google Maps for navigating the city, or park maps on Maplets, or topos on Avenza Maps.
- Any cloud-sync'd notes containing your trip itinerary or important travel notes for your trip.
- Any cloud-sync'd emails containing reservation or confirmation numbers. I like copying these to a google doc that's shared with my travel companions as our master itinerary. We each make sure to toggle the doc to "available offline" mode so we can access it whenever we might need it. You might also want to print this doc.
Add keyboard shortcuts
Going to post to social media while you're traveling? Or just can't remember how to spell that crazy foreign name? One of my favorite tips is using a lesser-known feature: text substitution. Basically, this involves typing a "shortcut" that expands into a larger word or phrase. It's incredibly handy to use all the time, frankly, but especially when traveling.You will absolutely love this tip. It’s a game changer. Here are some of the ways I use text substitution:
- Entering personal data when making reservations. Typing "eml" expands to my email address, "phn" types in my phone number, and so forth.
- Conjuring up emoticons is as easy as typing a shortcut. For me, "kk" instantly conjures up the "thumbs up" emoji.
- I often use a specific hashtag for each of my trips. It can be fun, help others follow along, and makes it incredibly easy to recap your vacation later. Since I'm posting this specific hashtag regularly, I just create a text shortcut for it. I usually use "qq" and voila, it magically becomes #ontheroadinthemiddleoffuckingnowhere.
- I find myself misspelling places or words—I'm looking at you, Hawaii—so I create a shortcut for it to autocorrect the word for me. This is also a way to get around your non-travel-related spelling errors, or when your phone thinks you actually meant "ducking."